The Toolbar
This toolbar sits below the Menu Bar and above the Main Form, and contains one-click availability of some commonly required functions. Many of these functions are also available under the menus in the Menu Bar.
The toolbar is context-sensitive, automatically displaying the functions relevant to what you are doing at the moment. Functions that cannot be used in the current context are grayed out.
Patient Search

(or press Ctrl + P on your keyboard)
Brings up the Patient Search dialog window to allow you to search for jobs by specifying all or part of a patient's name.
Read more about the Patient Search here
Select Customer
Customers
(or press Ctrl + G on your keyboard, or use the Customer menu > Select or Add New)
Brings up the Customers selector where you can select a customer or add a new one.
Click the Add New button to add a new customer. You can also add dentists and practices from the Setup Wizard.
Read more about the Customers selector here
Read more about adding a new customer here
Customer History
History
(or press F11 on your keyboard, or use the Customer menu > History)
Displays the Customer History screen, which lists all invoices, jobs and transactions for the current customer. Most recent transactions are shown at the bottom of the list, with booked in jobs showing below these.
Read more about the Customer History screen here
Add Payment
Add payment
(or press ctrl + M on your keyboard, or use the Customer menu > Add Payment/Credit, or Make Refund/Debit)
Allows you to add a credit onto the currently displayed customer's account.
To add a debit, use Customer menu > Make Refund/Debit.
Select Product
Products
(or press Ctrl + I on your keyboard, or use the Product menu > Select or Add New)
Brings up the Products selector where you can select a product to add to the current job (if it's in an Edit state), or add/create a new product.
Click the Add New button to create a new Product. You can also create products from the Setup Wizard.
Read more about the Products selector here
Read more about creating a new product here
Delivery Runs
Delivery run
Produce delivery run sheets for your drivers, and produce delivery notes.
Read more about this feature here.
Procuur

If your LabManager software is already linked to Procuur, this button will open the Procuur dashboard with the current order visible (if you are logged in to Procuur).
Notifications

When events occur from cloud services (Procuur or LabManager cloud for Practices) then this icon will flash and the counter will increment.
Click the icon to visit the notifications list.
See more about notifications here
Jobs List
Jobs
(or press Ctrl + J on your keyboard, or use the Job menu > Select)
Brings up the Jobs selector where you can list jobs by using different search criteria. Double clicking on any job will bring it onto the Main Form.
Read more about the Jobs selector here
Navigation controls

These buttons allow the user to move through the jobs on the system, assuming it is a valid to do so at the time - for example, if the user is modifying a job but has not yet booked it in, they will be prevented from moving to a different job.
In order from left to right, the navigation controls allow the user to Move to the first job in the system, to the previous job, to the next job, and to the last job. Jobs are ordered by job number.
You can also use the following shortcut keys on your keyboard as an alternative to clicking these icons:
|
Ctrl + Home |
Move to the first job |
|
Ctrl + Page Up |
Move to the previous job |
|
Ctrl + Page Down |
Move to the next job |
|
Ctrl + End |
Move to the last job |
Forms Manager
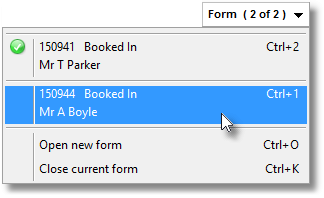
Each job is displayed on its own Sales Form, but you can work with up to 9 forms simultaneously by using the Forms Manager at the top right of the Main Form. Working with multiple forms allows you to easily refer to other jobs and accounts while working on a different job.
|
• |
To open a new form, click the "Open new form" option on the Forms Manager menu, or press Ctrl + O on your keyboard. The new form will display in place of the form you currently have open. |
|
• |
The number of forms you currently have open is shown on the Forms Manager item on the toolbar. The currently visible form is indicated with a green tick in the menu. In the screenshot above, there is 2 forms open and the user is currently viewing the second one: "Form (2 of 2)". |
|
• |
To move between forms, either select the form you wish to move to from the Forms Manager menu, or press Ctrl + the number of the form. eg. to move to form 2, press Ctrl + 2. |
|
• |
To close the current form, select "Close current form" from the Forms Manager menu, or press Ctrl + K on your keyboard. |
My Preferences

(or press Ctrl + U on your keyboard, or use Tools menu > My Preferences)
You can modify the settings for the current user from here, including colour scheme, tab options and your password. The screen you will be presented with is the same as for editing a user from the Control Centre.
You will not be able to add permissions to the current user unless your Control Level is Advanced or Advanced (Manager).
Read more about the Preferences screen here
Control Centre

(or press Ctrl + S on your keyboard, or use the Tools menu > Control Centre)
Use the Control Centre for configuring LabManager for your lab, including managing your customers, products, price lists etc.
Depending on the Control Level of the currently logged in user, you may only have access to the Setup Wizard page. An Advanced user will have access to the Advanced page also.
You can also access the Control Centre from the cog icon on the toolbar.
Read more about the Control Centre here