MyDentist / IDH invoicing
MyDentist/IDH requires that you send them a CSV invoice file, which they can process using their software. Transactor provides the tools to do this via the EDI Invoicer, which is part of the Commercial Module add-on.
Before you can create CSV files to send to IDH, there is some configuring involved which we will not cover in this tour. Details can be found in the user guide or via our step-by-step helpdesk article:
Configuring Transactor for MyDentist/IDH invoicing
Credit notes
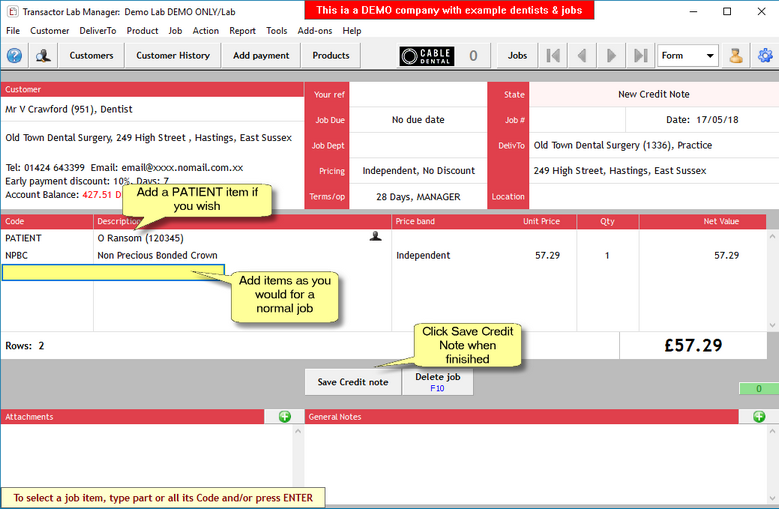
You can create a credit note in much the same way as you would create a job but you will need to use the action menu.
| • | Use Action menu > New Credit Note. |
| • | Add a customer in the same way you would for any job. |
| • | Add a PATIENT name if you wish, by typing the code PATIENT in the code column, pressing RETURN then confirming. |
| • | Add some job items - you will be giving credit to the customer for these once the credit note is marked as completed, so don't worry about changing the prices to negative as Transactor will take care of this. |
| • | Click Save Credit Note on the Action bar or select it from the Action menu. |
You will be asked how you want to allocate the credit from your credit note, in the same way you would manually allocate credit from a payment. Often a credit note will be used to pay off one particular invoice.
Read more about allocating credit more in the chapter "Managing Payments & Remittances".
Find an existing practice
You can look through the practices in the database either by visiting the Control Centre > Setup Wizard > Practices page, or through the DelivTo area of the Main Form. We'll work through the Main Form method here.
On a clear Main Form, click on the area below the "DelivTo" box. You may notice your mouse pointer changes to a pointing finger when you hover over this area.

You'll be presented with a list of all your practices. If you have a long list, then enter some text in the 'Contains' filter box and click Search.
If you want to copy the practice onto the Main Form, select it then click the 'Select' button, or double-left-click on the practice with the mouse.
To edit/modify the practice direct from the list, right click the row and choose 'Edit'.
To add a new practice or delivery address you can click the Add New button. Also see Add a New Customer
Speed entry
This can significantly speed up entry of jobs if you are familiar with your item codes.
If you know the item code you can type it in to the Code column of the Main Form with a comma (and optional quantity) and just press RETURN. That's it!
Try speed entry now. On a new line, click in the Code column and type a product code with a comma, such as 'PJC,' (PJC and a comma) and press RETURN.


The Porcelain Jacket Crown item was added instantly with a quantity of 1, with the correct price for the customer's usual price band.
Try speed entry again now, but we'll add a quantity. On a new line, click in the Code column and type 'PJC,3' and press RETURN.

If the price needs to come from a different price band, you have two options. If it's an odd occurrence, don't use speed entry for this row, just use the code without the comma. Then you'll get the opportunity to choose your price band etc. Otherwise, change the job's Usual Pricing.
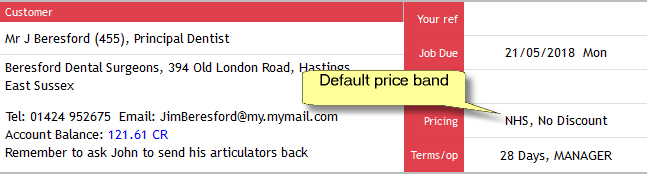
Usual pricing
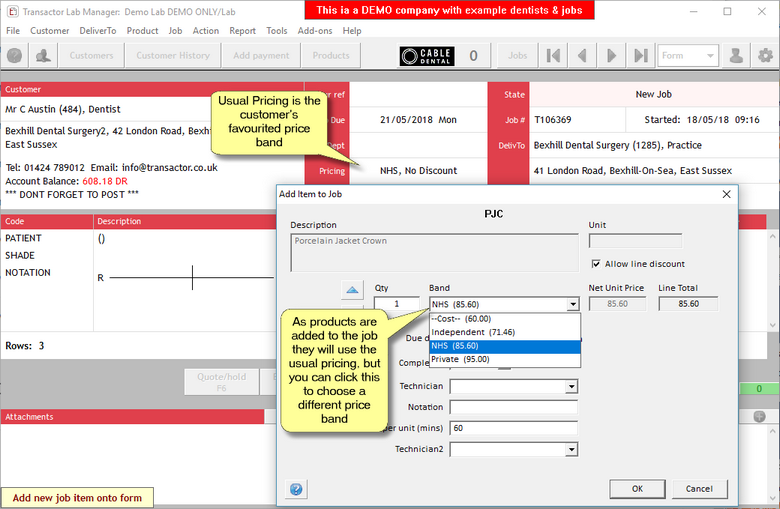
Line items you add to a job will default to using (start off with) the price band indicated in the Pricing box.
To change the usual prices, click the Pricing box and press RETURN.
Of course, you can still choose another price band or set a custom price on a line by line basis.
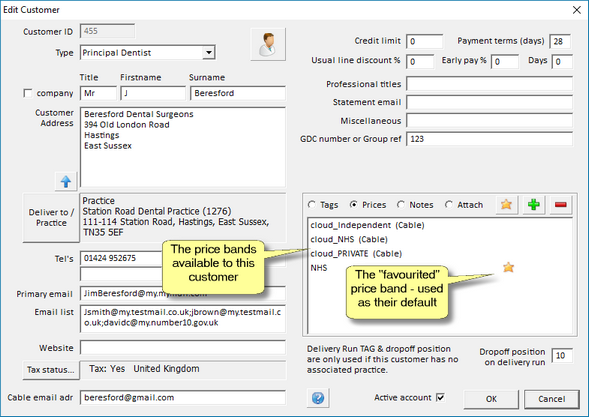
When you start a new job, the usual Pricing comes from the customer's favourited price band, which you will find in the customer's profile.
How the usual Pricing works
How the usual Pricing affects standard line item entry
When you select an item code from the Main Form or product selector window, you're presented with the 'Add item to Job' window. The price band is already set to the current job's usual pricing. In a lot of cases you can just press RETURN to put this item onto the job.
How the usual Pricing affects Speed Entry
If the price needs to come from a different price band to the one you want, you have two options. If it's an odd occurrence, don't use speed entry. Using the standard line entry you'll get the opportunity to choose your price band etc. Otherwise, change the job's usual Pricing so that this and subsequent line items will default to your preferred price band.