How to get here
If a Customer is on the Main Form:
| • | Click on the Customer box when your mouse pointer is a pointing hand |
| • | or Choose Edit from the Customer menu |
| • | or Press Return on your keyboard when the customer name is highlighted |
From the Customers selection list (available from the Customer menu > Select or Add New):
| • | Right click (or press Spacebar with a customer highlighted) on a customer in the list, and select Edit from the popup menu |
From the Control Centre > Setup Wizard > Surgeons or Practices page:
| • | Double click on a customer in the list, or select it with the keyboard and press Return |
Type
Choose a Customer Type. eg Surgeon, Practice, Direct Patient, Lab
Company - Title - First name - Surname
Tick Company to make the box into one to enter a company or organization name.
Fill in the details. Professional Titles eg. B.D.S O.B.E can be entered on the right.
Customer address
This is the "Invoice To" address.
Tip:
If this is going to be the same as the Practice / Delivery address, we suggest setting the Practice/Delivery address first (below), then click the ![]() icon to the left of this box to copy the address over.
icon to the left of this box to copy the address over.
Deliver to / Practice
If your Invoicee is a Dental Surgeon then make sure you choose or enter a new Practice here because a lot of the reports and other functionality depend on this. So even if the Dental Surgeon is working from and being invoiced at the same address then still fill in this section. You use the ![]() icon to copy this delivery address over to the Invoice address.
icon to copy this delivery address over to the Invoice address.
To select or add a Deliver to / Practice
| • | Click Deliver to / Practice |
| • | In the Name ID box select an existing Deliver to / Practice or click Add New |
Once you have selected or added Deliver to / Practice you should use the ![]() icon to copy this delivery address over to the Invoice address.
icon to copy this delivery address over to the Invoice address.
Tels / Mobile
You've got space for up to 3 telephone numbers here.
This is the customer's main email, it must be unique. You can only enter a single email address in this box. (you can enter multiple email addresses in the Email List box that is below this one).
You can send emails to this address at any point where you could normally print. Just select "Send to customer primary email" from the Send To list, or click the email icon on a preview window.
You must have configured your email settings before emails can be successfully sent from Lab Manager.
Also see Send to's
Add one or more alternative email addresses here. You'll be able to use the "Send to customer email list" Send To output when emailing Reports and/or Documents to this customer.
How to format multiple Email addresses
Examples |
|
Single email |
jsmith@gmail.com |
Multiple emails |
Separate email addresses with commas or semi-colons jsmith@gmail.com,AbcBrighton@gmail,DavidC@Number10.gov.uk jsmith@gmail.com;AbcBrighton@gmail;DavidC@Number10.gov.uk
Note: for versions before 7.08 (November 2013) you should also use angled brackets as below <jsmith@gmail.com>,<AbcBrighton@gmail.com>
|
You must have configured your email settings before emails can be successfully sent from Lab Manager.
Also see Send to's
Website
The customer's website address, if available.
Tax Status
If you need to, click the button and choose a Country, enter a Tax Reg No and Apply Tax to Yes
This will be used as the default price list / price band / quality grade for new orders (jobs). So for example if you start a new job, you'll see this price band in the Pricing Box. It's not set in stone, you can double click into the Pricing box on a job at any time you are editing the order and change it. That will change it just for the order. The price band is also flexible at lineitem level so within each lineitem row you can over-ride the 'usual price band' or even enter your own custom price.
All the 'Usual' means is that it can speed you up on entering jobs as in most cases you don't have to select or change the Price that is automatically selected for you as you enter job items. Each customer may 'usually' be sold stuff from the 'usual' price list, but it can be changed at any time.
You can, of course, set up new and varied Price lists/bands through the Control Centre.
Credit limit
Your allowed credit limit for this customer for information and reporting purposes.
The number of days agreed between you and your customer, for full payment to be received on invoices.
The usual order discount rate that will be applied to new jobs for this customer. It can be over-ridden on the job itself.
Early pay %
This customer's early payment discount rate. If this value is zero then no early payment offer text will appear on the statement.
Days
If you are using the Early Payment discount incentive then this value will affect what is printed on the tear-off portion of the Customer Statement. Literally the number of days full payment must be received by for the customer to be eligible for their early payment discount.
If this value is zero then no early payment offer text will appear on the statement.
Note, on statements the 'date that payment should be received by' is calculated using this Days figure, based on the final date of the statement period. If you are running a monthly statement, the discount 'cut-off' date will be the this number of Days after the end of the month.
Renew Date
Use this to store a membership, or subscription type renewal date. If you require a report to administer memberships/subscriptions, or a menu utility to bulk update these dates, submit your requirements to Transactor Support for a quote.
Professional Titles
eg. BDS MBE BA(hons) etc. These details will appear on statements and invoices next to the customer name, so it is possible to use this field for other purposes, such as a Work Order number or external customer reference number.
Note
Enter general notes here that relate to this customer.
Miscellaneous
General miscellaneous or extra notes area to store with this customer record. It is possible to rename this box in your system to store specific information for your company's business rules. Contact Transactor support for assistance.
Group Reference
This can be used to store a 'customer group' reference if your customer requires this information on your documentation. eg. IDH Practice number.
Assign predefined or custom Tags to this customer record. These may be used to easily select groups of customers for reports or change reporting and document printing behavior.
Some TAGS are built into the default system. For example DO NOT PRINT PATIENT NAMES ON INVOICES AND STATEMENTS. If this TAG is assigned to this customer, Lab Manager will print the Patient Reference only on those documents. Another built-in tag is PATIENT NAME PRINT FORMAT TFS which will make Lab Manager print patient names in Title, Firstname, Surname order on documents rather than the default Surname, Firstname, Title order.
To assign a TAG, click ![]() then double click a TAG in the list.
then double click a TAG in the list.
To remove an assigned TAG, highlight a TAG in the list then click ![]()
To add a TAG to Transactor Lab Manager's list of available TAGs, go to the Setup Wizard, click Advanced, then Tags.
You can add as many TAGS as you like to a customer record.
Active
If you un-tick this, then this customer record will be marked Inactive. It's the same as choosing Customer > Delete (set as Inactive).. from the menu.
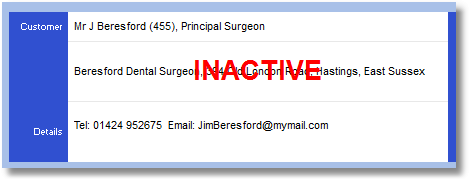
If an inactive customer is selected onto the form (using the account number or by searching for inactive records), then the Main Form will stamp INACTIVE in red across the customer's address.
You won't see this customer in the normal Selection lists until such time as you re-activate the record.
To 'retrieve' an Inactive/deleted customer onto the Main Form
If you know the account number, enter it in the Customer box and press Enter. The other way is to use the customer selector, search for Deleted/Inactive customers.
To Re-activate / Un-delete a Customer
Retrieve the customer record onto the Main Form, then choose Customer menu > Undelete (Set as Active), or with the customer's detail screen showing just put a tick in the Active box.