How to get here
Tools menu > Control Centre > Advanced > Tags.
The current user will need to have Advanced control level to access this page.
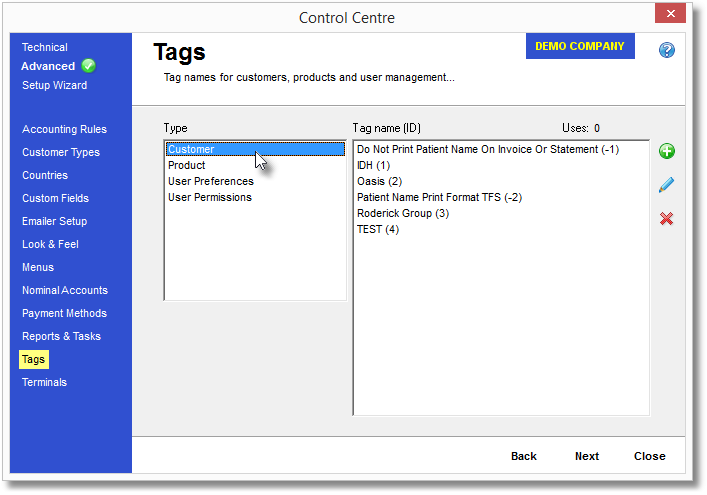
This page allows you to create, edit or delete your tags. Tags are used to apply a property to a group of customers, products or users. For example, you can tag all your customers that belong to a particular group of practices.
You can apply any number of tags to a customer, product or user. This page lets you control which tags are available for use.
You will generally only need to work with customer tags. Tagging a customer can let you choose to create reports for just those customers you've given a particular tag to.
Tags for products are commonly used to control how particular products appear on reports, such as preventing internal notes from appearing on an invoice.
Tags for users are commonly used to control which parts of the system the user is allowed to access, or to control which confirmation messages the user will see.

Type
This box lists the types of tags available. Click an item in this list and the box to the right will change to display the tags available for this tag type. You may notice the "Uses:" label at the top of the right-hand list which gives you an easy reference of the number of items in your database that are using the currently selected tag.
Customer |
These apply to customer accounts, be they surgeons, practices or any other type of customer account. Tagging customers allows you to search for customers with a particular tag, or to only create reports for customers in the Batch Report Manager for whom you've given a particular tag. See Customer - Edit for more information.
|
Product |
Product tags govern how a product behaves on reports, such as to tell Lab Manager not to print a product with a particular tag on a Summary Invoice or Statement Detailed. See Adding a New Product for more information.
|
User Preferences |
Specific usability settings for a user. One user may prefer their Main Form to be cleared after booking out a job, whereas another user may not want this feature. In this case you would add the "Clear form after - book out completed" tag to the first user's profile. See Users/Technicians for more information.
|
User Permissions |
These tags govern what areas of the system a user has access to. See Users/Technicians for more information.
|
![]() Add a New Tag
Add a New Tag
Ensure you have the desired tag type selected in the left-hand list, then click the circular green plus symbol then enter a name for the Tag. Click OK to save the tag, or click Cancel to abort creating a new tag.
Once you have created a new tag it is available for use, and you will need to view a customer, product or user (depending on the tag type) to add the new tag to it.
![]() Edit a Tag
Edit a Tag
Select the tag in the right-hand list and then click the pencil icon to edit the name of the tag. You will be presented with the same form as when creating a new tag (above) except the box will contain the current name of the tag you have selected.
Make any changes as necessary and click OK to save or Cancel to discard your changes. When you change a tag's name, this name will be reflected on all items that currently use that tag. For example, if you change the name of the "Oasis" tag to "Not Oasis", all those customers tagged as Oasis will now show as being tagged as "Not Oasis".
 Delete a Tag
Select the tag in the right-hand list and then click the red cross icon to delete the tag. You will be prompted if you are sure you wish to delete it, and the number of items that currently have that tag will be shown.
Click OK to confirm the tag deletion, or Cancel to abort deleting the tag. Only the tag will be removed, the customers, products etc. that used the tag will still exist but they will have the tag stripped from them.