How to get here
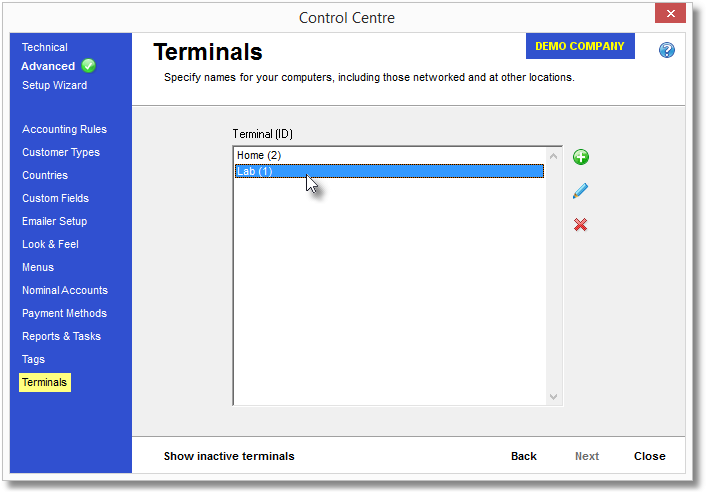
Tools menu > Control Centre > Advanced > Terminals.
The current user will need to have Advanced control level to access this page.
Terminals represent a physical computer that users can access the Lab Manager database from. If you only use Lab Manager on one computer, you'll likely not need to do anything on this page as the default "Lab" terminal will be the only terminal you'll connect from. If you like to take your data home with you (via a backup) and restore at home, you might use the "Home" terminal while at home and the "Lab" terminal when at the lab.
For network users, you may have 5 different people that use Lab Manager, but maybe they use any 1 of your 3 computers to do this. Maybe they use any 1 of your 10 computers. Each of those computers can be given a terminal name.
Transactor Lab Manager can behave differently depending on which terminal is being used, such as sending your output to a different printer or display the text on the Main Form larger if that computer has a smaller screen.
![]() Add New Terminal
Add New Terminal
Click the green plus symbol to the right of the list, and you will be presented with the Add New Terminal window
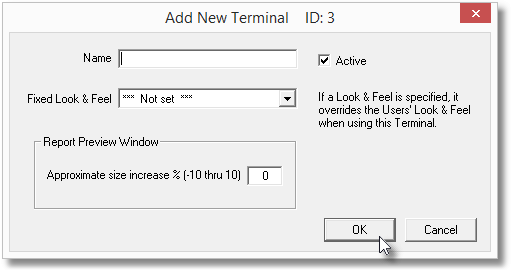
Give the new terminal a name. You should keep this simple such as Home, Lab, Reception, Martin's PC.
The Active box denotes whether this terminal is available for Lab Manager to use. If this box is not ticked then your users will not be able to log in from this terminal name.
You can set a Look & Feel using the "Fixed Look & Feel" box, or leave this as "*** Not Set ***". If you do select a Look & Feel from the list, anyone logging in on this new terminal will be forced to use the Look & Feel specified here. If you leave this box as Not Set, the user's own Look & Feel will be used on this terminal. If there is display considerations on this computer, such as a small screen size, you might want to consider restricting users to using a particular Look & Feel to ensure readability.
The "Approximate size increase %" allows you to specify if the preview window on this terminal should be enlarged or reduced. Transactor Lab Manager will try to intelligently fit it on the screen, but sometimes it may be necessary to override this using this setting. Choose anywhere between -10 and +10.
Once you've created a terminal, you may want to modify your desktop shortcut to force Lab Manager to log in to this terminal.
![]() Edit a Terminal
Edit a Terminal
Select an existing terminal in the list, then click the pencil icon on the right to open the edit window. Refer to the description for Add New Terminal (above) for guidance on the boxes you will see.
![]() Remove a Terminal
Remove a Terminal
Select an existing terminal in the list, then click the red cross icon on the right to mark a terminal as inactive. Terminals are not deleted for good so you can view your inactive terminals by clicking the "Show Inactive Terminals" button at the bottom of the page.
![]()
Show Inactive Terminals
Click the "Show Inactive Terminals" button at the bottom of the page to show all your inactive (deleted) terminals. Users will not be able to log in from these terminal names while they are inactive. To make a terminal active again you will need to select it, then click the pencil icon to edit it, then put a tick in the Active box before clicking OK.
Note that once you've made a terminal active it will be removed from the inactive list so you will need to click the "Show active terminals" button to return to the active list.
Once you have created a terminal, you will need to tell Transactor Lab Manager to log in as that terminal when you start it.
If you are not confident with editing Windows shortcuts you may want your IT guys to perform this step, or call the Transactor helpdesk who can do this for you.
| • | Locate the shortcut icon on your Windows desktop that you usually use to open Transactor Lab Manager |
| • | Right click this shortcut, then select "Properties" from the pop-up menu |
| • | In the Properties box that appears, locate the "Target" box and move your cursor to the very far right of whatever is in the box. The final part of this target will probably look something like this: "\data\ti.add,Lab,MANAGER,,1" |
| • | In this example, the terminal name is Lab so replace this with the terminal name you wish this computer to log in as. |
For example, to force this computer to log in as Reception-PC, you would change the above example target to have this on the end: "\data\ti.add,Reception-PC,MANAGER,,1"
Ensure you type the terminal name exactly as it appears in the Terminals list.