How to get here
Tools menu > Control Centre > Setup Wizard > Printing Rules.
From this page you can control which reports are auto-suggested for printing, as well as which reports should be available at the different stages of a job.
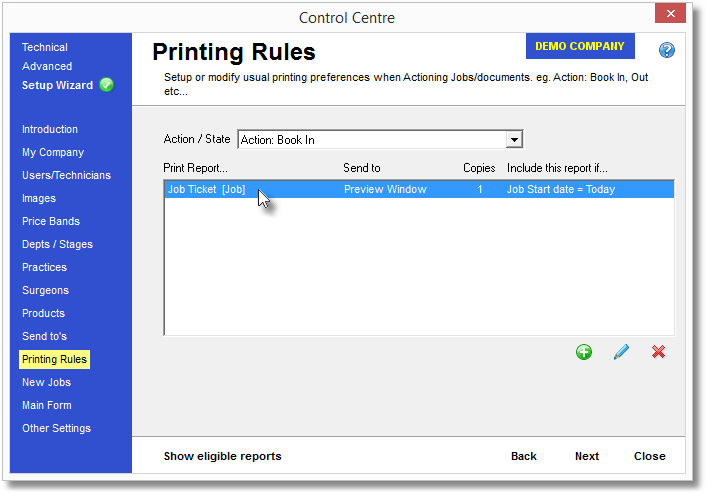
The "Action and Job State" box allows you to select the action and state of the job that you wish to configure.
| o | An Action is what the user performs on a job that results in Lab Manager wanting to print something, such as Booking In, Booking Out or just clicking the print icon on the toolbar. |
| o | The Job State is the current state the job is in, such as it's Booked Out & Invoiced, or it's a New Job. |
The large box lists the reports that are automatically suggested for printing by Lab Manager (the 'defaults'), under the conditions selected in the "Action and Job State" box.
For example, in the screenshot above, Lab Manager is set to suggest showing a Job Ticket in the preview window whenever the user Books In a job.
These are the available actions and job states:
Action and State |
Produce the documents shown in the list when the user... |
Action: Book In |
...Books In a job |
Action: Book Out Completed |
...Books Out a job as Completed |
Action: Book Out Ongoing |
...Books Out a job as Ongoing |
Action: Hold/Quote |
...saves a job as On Hold/Quote |
Action: Print, Job state: Booked In |
...presses F5 Print, while viewing a Booked In job |
Action: Print, Job state: Booked Out Completed |
...presses F5 Print, while viewing a Booked Out Completed job |
Action: Print, Job state: Booked Out Ongoing |
...presses F5 Print, while viewing a Booked Out Ongoing job |
Action: Print, Job state: Credit Note |
...presses F5 Print, while viewing a Credit Note |
Action: Print, Job state: Edit job, Customer present |
...presses F5 Print, while viewing a job in Edit Mode that has a Customer on it |
Action: Print, Job state: Enquiry, Customer present |
...presses F5 Print, while viewing a job in Enquiry Mode that has a Customer on it |
Action: Print, Job state: New job, Customer present |
...presses F5 Print, while viewing a new job that has a Customer on it |
Action: Print, Job state: On Hold |
...presses F5 Print, while viewing an On Hold job |
Action: Save Credit Note |
...saves a Credit Note |
Action: VOID Credit Note |
...voids a Credit Note (using Action menu > VOID invoice or credit note) |
Action: VOID Invoice |
...voids a job Invoice (using Action menu > VOID invoice or credit note) |
To change the default documents for an Action/State, first choose the Action/State from the drop-down list at the top of the page, then use the following options:
![]() Add a default report
Add a default report
Click the green orb with the white plus symbol to add a default report for the currently selected Action and Job State. You will be presented with the form below.
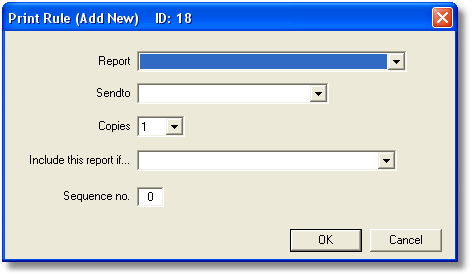
Select the report in the "Report" box that you would like to become a new default report. You will only see reports that are listed in the eligible reports list, so if the report that you need isn't available in this list you will need to Cancel this form and then add your report as an eligible report. (see below)
Select an output type in the Send To box. This could be your default printer, an A5 printer, a PDF file, email etc. You can set up the available outputs by visiting the Send To / Outputs page of the Setup Wizard.
Choose the number of copies to default to. The user can alter this on-the-fly when they are printing this report for real.
The "Include this report if..." box will allow you to restrict the use of this report only when a condition has been met, such as only when the customer has a valid email address available or has a particular Tag ID.
The Sequence number is the position this report will appear in the print box when the user performs the specified action. For example, when booking out and invoicing an job, should the invoice be printed first, before a patient statement, or after any other documents have been printed. The reports will be listed in ascending order of this number, and the number does not need to be sequential.
![]() Edit a default report
Edit a default report
Select a report in the Print Report... box and then click the pencil icon. You will be presented with the same screen as for adding a new default report (above) but the boxes will contain the details for the selected report. Click OK to save any changes you make, or click Cancel to discard them and revert to the settings as they were.
![]() Remove a default report
Remove a default report
Select a report in the Print Report... box and then click the red cross icon. You will be asked to confirm your action before the report is removed from the default list.
Only reports that have been pre-defined as being "allowed" to print at different stages of a job will be offered to the user. For example, you won't need to print a credit note when you're booking in a job, and you won't need to print a patient statement when you're saving a credit note.
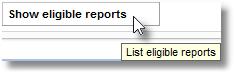
To change which reports are allowed to print at different stages of a job, you'll need to click the "Show eligible reports" box at the bottom of the page, and a new box will appear showing all the available reports for the Action/State selected at the top of the page.
The new box lists the reports that are eligible for printing given the selected action and job state. Although the reports in this box are available, only the ones in the upper box will automatically be suggested for printing. The user will have to manually select a report at run-time if they want any of the eligible reports that aren't automatically suggested.
To change which reports are available to print at a particular stage, follow this procedure:
| • | Select the action and job state you want to configure from the list in the "Action and Job State" box. |
| • | All the eligible reports will be listed in the lower box. The user will be restricted to only being able to print these reports under the selected conditions. |
You can use the ![]() Add and
Add and ![]() Subtract buttons beside the eligible reports box to make different reports available for the given action and job state. Note, you will not be able to select a report as a default (using the steps above) unless it is already listed as an eligible report!
Subtract buttons beside the eligible reports box to make different reports available for the given action and job state. Note, you will not be able to select a report as a default (using the steps above) unless it is already listed as an eligible report!
![]() Add an eligible report
Add an eligible report
Click the green plus symbol to add a report to the eligible reports list. You will be presented with a list of reports to select from.
![]() Remove an eligible report
Remove an eligible report
Select the report in the eligible reports list that you wish to remove, and then click the red subtract symbol. You will be asked to confirm your action. You will not be able to remove a report if it is also listed as a default report in the upper box.