How to get here
Tools menu > Control Centre > Advanced > Customer Types.
In Transactor, you can store different types of customers in their own Customer Type, such as Practice, dentist or Direct Patient. This will allow you to easily differentiate between customer types, and allow you to specify some default settings for each type of customer.
The current user will need to have Advanced control level to access this page.
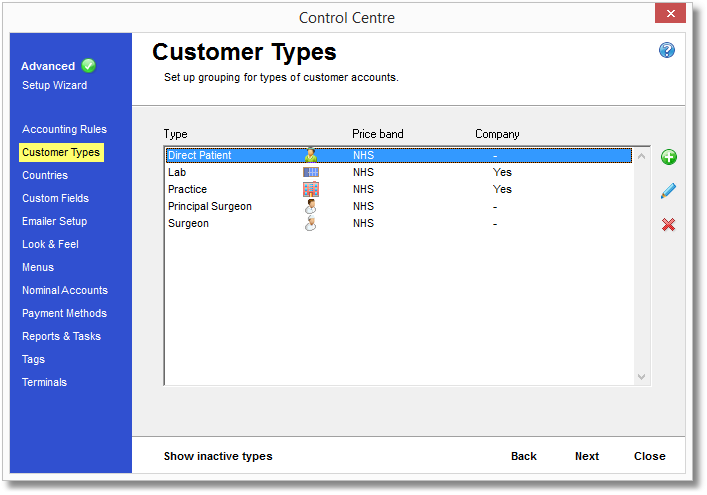
Click the green orb with the white plus symbol within it to create a new Customer Type. You will be presented with the form below:
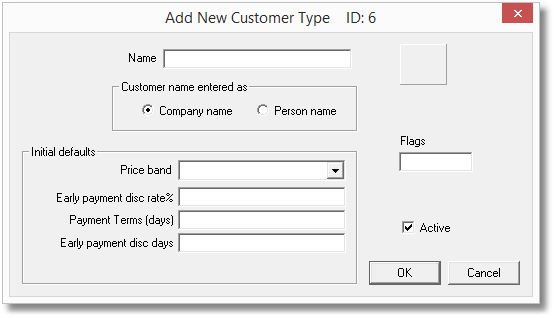
Complete the form for your new Customer Type then click OK to save your settings, or Cancel to discard it.
Name is the name you wish to give this Customer Type. It should be easy for your users to recognise, such as "dentist", "Principal dentist" etc.
Image allows you to assign an icon to this Customer Type, and can be changed by clicking on the empty square that is displayed just to the right on the Name box. Select an icon from the selection that is displayed by clicking on it.
Customer Name Entered As will allow you to specify how the Customer name is shown on the Customer dialog. You should select the correct display type from the two options:
Company name will display the name as a company, ie. one box
Person name will display the name as a person name, ie. title, first and last name.
Flags sets whether this Customer Type is considered a practice or dentist for reporting purposes, as well as which customer types can be used as a DeliverTo address. Generally you will only want to mark a dentist or Principal Account as a dentist. You can enter a single code or multiple codes in this box. eg. S or SD
Enter an S in this box to consider this customer type as a dentist for reporting purposes.
Enter a P in this box to consider this customer type as a Practice for reporting purposes.
Enter a D in this box to allow use of this customer type as a Deliver To address.
Price Band sets the default price band/usual prices to use for this Customer Type. Modify the available price bands from the Price Bands page of the Setup Wizard.
Settlement discount rate % allows you to set the percentage discount applied when this type of customer settles their invoices early.
Settlement discount days sets the number of days a settlement discount applies (at the rate set in the box above) before expiring and the usual price applies. This applies only to this Customer Type.
Active determines if this Customer Type is usable by Transactor or not. When ticked, this Customer Type is active and can be used, when the box is cleared it is inactive and not usable until made active again.
Select the Customer Type in the list and then click the pencil icon to make changes to that Customer Type. You will be presented with the same form as when creating a new Customer Type (above) except the boxes will contain the details of the Customer Type you have selected.
Make any changes as necessary and click OK to save or Cancel to discard your changes.
 Delete a Customer Type
Select the Customer Type in the list and then click the red cross icon to delete that Customer Type. This will permanently delete the Customer Type from the database.
If you think you may want to re-use this Customer Type in the future you should consider marking it as inactive rather than deleting it permanently. To do that, edit the Customer Type and remove the tick from the "Active" box.
Click the "Show Inactive types" button to choose between displaying active or inactive items. Active items will be displayed in black text, inactive items will be red. Customer Types that are available for use throughout Transactor are active, and usually only those you no longer need are marked inactive as these can no longer be used within Transactor.
To reinstate an inactive Customer Type, first view your inactive items by clicking this box. Then, select the item you wish to reinstate and click the Edit button (the blue pencil) and put a tick in the "Active" box before clicking OK.
Now the Customer Type has been made active it will have disappeared from the list so you will need to click on the "Show active types" button to see the reinstated customer type.