Credit Notes
You can create a credit note in much the same way as you would create a Sales Order but you would use the "New Credit Note" option from the Action menu.
Go ahead and create a new credit note using the Action menu.
Add a customer in the same way you would for any job.
Add some job items - we will be giving credit to the customer for these once the credit note is marked as completed, so don't worry about changing the prices to negative as Transactor Lab Manager will take care of this.
Click Save Credit Note on the Action bar or select it from the Action menu.
You will be asked how you want to allocate the credit from your credit note. Since this is a credit on the customer's account, it will pay off some of their outstanding invoices. The balance will automatically be updated accordingly, but Transactor Lab Manager needs to know if you want to assign the credit to particular invoices, or just pay off the earliest available invoices. If you're not worried about how the credit is allocated, you can just click "Auto Apply" and Transactor will take care of it. If the credit note was created to, say, refund for one particular existing invoice, you can apply the credit to the invoice by holding CTRL on your keyboard then clicking on the invoice. If you make a mistake you can CTRL+click the invoice to remove the amount, or click the "Un-Apply" button the remove all allocations from this credit.
We'll discuss allocating credit more in the chapter "Managing Payments & Remittances".
Once you've saved the credit note, and applied the credit you could view the Customer's Account History (choose Customer History then search by Account History) and find your new credit note near or at the bottom of the list. Note that any Booked In or Booked Out Ongoing jobs will always be listed at the bottom of the list as they don't yet have a tax date.
Notice that since your credit note represents a credit, the amount has been converted to negative and the balance adjusted accordingly. If you allocated all the credit from your credit note, you will have a green orb beside it, otherwise you will have an orange orb.
Find an existing Practice
You can look through the Practices in the database either by visiting the Control Centre > Setup Wizard > Practices page, or through the DelivTo area of the Main Form. We'll work through the Main Form method here.
On a clear Main Form, click on the area below the "DelivTo" box. You may notice your mouse pointer changes to a pointing finger when you hover over this area.

You'll be presented with a list of all your Practices. If you have a long list, then enter some text in the 'Contains' filter box and click Search.
If you want to select the Practice onto the Main Form, select it then click the 'Select' button, or double-left-click on the Practice with the mouse.
To edit/modify the Practice direct from the list, right click the row and choose 'Edit'.
To add a New Practice or Delivery address you can click the Add New button. Also see Add a New Customer
Speed Entry
This can significantly speed up entry of jobs if you are familiar with your item codes.
If you know the item code you can type it in with a comma (and optional quantity) and just press ENTER. That's it!
Try speed entry now. On a new line, click in the Code column and type 'PJC,' (PJC and a comma) and press ENTER.
The Porcelain Jacket Crown item added instantly for qty 1, with the correct price for the Customer's usual price band.
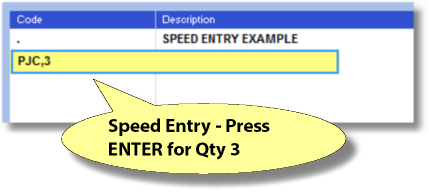
Try speed entry again now with a quantity. On a new line, click in the Code column and type 'PJC,3' and press ENTER.
If the price needs to come from a different price band, you have two options. If it's an odd occurrence, don't use speed entry for this row, just use the code without the comma. Then you'll get the opportunity to choose your price band etc. Otherwise, change the Job's Usual Price Band.
Usual Price Band
Line items you add to a job will inherit (start off with) the price band indicated in the Usual Price Band box.

To change the Usual Price Band, click it and press ENTER.
Of course you can still choose another price band or set a custom price on a line by line basis.
When you start a New Job, the Usual Price Band comes from each Customer's Usual Price Band. This means a new job started for Customer is personalised.
How the Usual Price Band works
How the Usual Price Band affects standard line item entry
When you select an item code from the Main Form or Product Selector window, you're presented with the 'Add item to Job' window. The Price Band is already set to the current job's Usual Price band so the price is automatically correct for quantity one. In a lot of cases you can just press ENTER to put this item on the Job.
How the Usual Price Band affects Speed Entry
If the price needs to come from a different price band to the one you want, you have two options. If it's an odd occurrence, don't use speed entry. Using the standard line entry you'll get the opportunity to choose your price band etc. Otherwise, change the Job's usual Price Band so that this and subsequent line items will default to your preferred price band.