How to get here
Use Tools menu > Preferences
or
From the Control Centre, Users/Technicians > double click on a user.
Complete or modify the boxes on this form using the following descriptions as a guide:
| • | User Name refers to the short descriptive name for this user that will be used around Lab Manager. (eg. "TECH" or "SARAH") |
| • | User Icon is the box beside User Name. You can click this and choose an icon to represent this user. |
| • | Full Name should be the user's full name. (eg. "Dental Technician" or "Sarah Connor") |
| • | Code will be used on reports and in on-screen lists where a shorter reference to the user is more convenient. (eg. "DT" or "SC") |
| • | Password is used to log in to the system, coupled with the User Name. You will need to enter the same password into the Confirm box to confirm it's been entered correctly. |
| • | Control level determines a user's level of access to the Control Centre. Selecting "Setup Wizard only" will only allow this user access to those options listed under Setup Wizard. You can also select Advanced although the MANAGER user will always have the Advanced (Manager) control level. These levels will give the user access to that control level and below - so an Advanced user will have access to the Advanced and Setup Wizard pages of the Control Centre. |
| • | Permissions and Usergroups are used to restrict or allow access to parts of the system for this user. You can add or remove permission levels using the green plus (+) and red minus (-) buttons to the right of the box. See the section below for further details for using this box. |
| • | Home Tab position allows you to specify which box on the Main Form is highlighted when this user moves to a clear form. |
| • | Look and Feel allows you to change the style of Lab Manager by choosing from a list of pre-designed templates. Templates can allow for different sized and coloured text and buttons and can be created within the Control Centre (under the Look and Feel category on the Advanced page) |
| • | Options allow you to streamline your work process by cutting out unwanted confirmation messages, or to prevent the TAB key from moving to boxes on the main form that you do not want to use. For example, by default you will be prompted to confirm Yes or No when you Book In a job but you can prevent that confirmation from happening, thus speeding up your procedures. You can add preferences using the green plus (+) button, and remove with the red minus (-) button. There's further notes below for all the available options. |
| • | Active marks this user as enabled or disabled. If you mark this user as not active, they will not be able to log in to Lab Manager unless they are marked "Is Active" again. |
Permissions and Usergroups
![]()
Add a new Permission or Usergroup
Click the green plus symbol next to the "Permissions and Usergroups" box to view the available options for this user.
| • | You can click any item in the list, then click on the Select button to add that permission to the user. |
| • | You can multi-select by holding down the CTRL key on your keyboard then clicking on each permission you wish to add while still holding down the CTRL key. Click Select when you're done. |
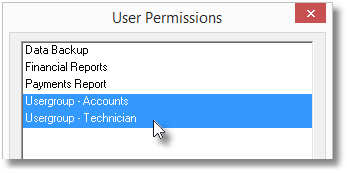
User Permission |
Description |
Data Backup |
Allows the user to run a database backup or restore |
Financial Reports |
Allows the user to run all the reports in the Accounting and Sales categories, as well as financial operations on the Tools > Utilities menu |
Payments Report |
Allows the user to run the Accounting > Payments report, even if they don't have the full Financial Reports permission |
Usergroup - Accounts |
The user can use the Tools > Utilities > Change Prices by a Percentage tool |
Usergroup - Technician |
The user is considered a technician, and can be allocated to job items |
![]()
Remove a Permission or Usergroup
Select the permission or usergroup you wish to remove from the user, then click the red subtract symbol.
You will be asked to confirm your action.
Options
![]()
Add a new Option to this user
Click the green plus symbol to the right of the "Options" box to view the available options for this user.
| • | You can click any item in the list, then click on the Select button to add that option to the user. |
| • | You can multi-select by holding down the CTRL key on your keyboard then clicking on each option you wish to add while still holding down the CTRL key. Click Select when you're done. |
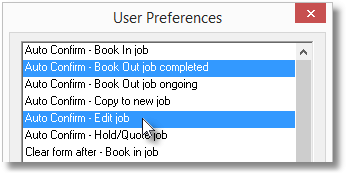
User Option |
Description |
Auto Confirm - |
The user will no longer be prompted to confirm when they perform the selected action. For example, a user without the "Auto Confirm - Book In job" option would be prompted to confirm Yes or No when they book in a job |
Clear form after - |
The Main Form will always be cleared after the selected action. |
Skip Next Tab position - |
When using the Tab key on the keyboard on the Main Form, the highlight will always skip the selected position |
Tab position after Edit Job - |
After choosing to Edit a job, the highlight is moved to the selected position |
Tab position after New Job - |
After starting a new job, the highlight is moved to the selected position |
Tab position after Select Customer - |
After adding a customer to the Main Form, the highlight is moved to the selected position |
![]()
Remove an Option from the user
Select the option you wish to remove from the user, then click the red subtract symbol.
You will be asked to confirm your action.