Click this image to view a video of this topic:

Enter the Setup Wizard by clicking the Control Centre icon ![]() on the Main Form Tool Bar, or by choosing Control Centre from the Tools menu.
on the Main Form Tool Bar, or by choosing Control Centre from the Tools menu.
The Control centre starts up in Setup Wizard mode, you should see the green tick at the top left.
If you havn't already done it, click the Clear Demo Company link at the bottom.
Choose 'My Company'..
To make changes, click 'Edit this page' box at the bottom.

It's a good idea to fill in the Bank Details with your Account number and sort code as in the example above.
Any BACS details will automatically be printed at the bottom of some reports and documents like the remittance slips on Lab Manager Statements. With the BACS payment system you don't need to enter your Bank's name or address.
Choose 'Users/Technicians'..
If you are getting started with Transactor Lab Manager, you can skip this page for now as everyone can log in with MANAGER and a blank password.
Choose 'Images'..
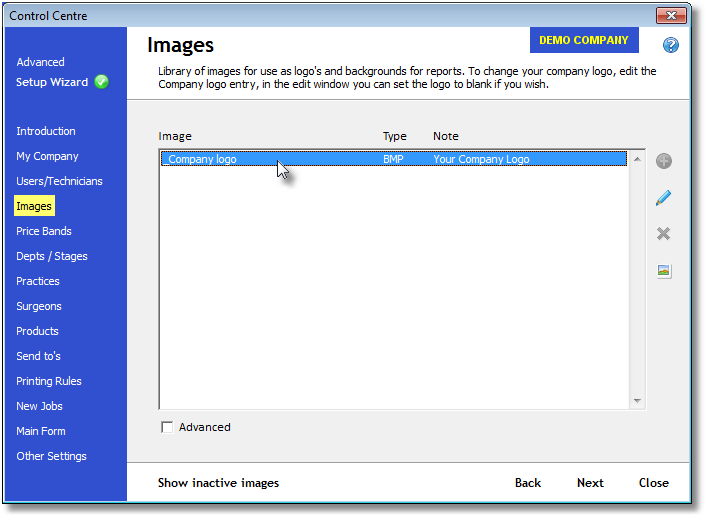
From this page you can add your company logo, if you have it available as an image file on your computer or network. You may find you need to resize your logo, so if you decide it doesn't look quite right on your reports we've provided the ability to blank it back out again.
To add your logo, double click on the "Company logo" row, then click on the "Get Image" button and locate your image file.
Experiment with your reports to see how the logo looks. You'll find it should appear on any of the reports that would normally be passed to the customer, such as invoices and statements.
If you wish to remove the logo, you can always select the "blank.bmp" image file that we've included in the Transactor Lab Manager installation folder. (c:\program files\transactor lab manager 7\exe)
We advise you not to alter any of the "Report -" images as these contain the background templates for the reports.
Choose 'Price Bands'..

The price bands represent different price lists - for example, a product may have one price when charged at NHS rates, and another when charged to a private customer. You will set the actual prices on the "Products" page a little later.
The number of possible price bands is unlimited but we believe it's best not to be tempted to add more than absolutely necessary. If a lab needs to offer a special price list to a customer, then we recommend using the Customer order discount to apply against one of your existing price lists. Set the percentage in the Customer record, all new orders will have this discount automatically applied to the job. Another attractive option is the 'early payment discount' so that there is a strong incentive to pay invoices within x days. Otherwise with too many price bands no-one in or out of the company will be able to spot errors in your pricing.
Read more about it here Customer Discounts (this will open in a new window so you can come back to this tutorial).
Choose 'Practices'..

You can Add, Edit or Remove practices from this page. Just use the familiar green plus symbol to add, the pencil to edit the currently selected practice, or the red cross to remove the currently selected practice.
You can also double click on a practice to view its details.

Fill in as many details as you have for the practice, you can always edit the details later. Once you've added practices on this page you can then create the surgeons that work at each practice on the next page.
Practices are often referred to as a "Deliver To".
Choose 'Surgeons'..

Your practices are shown in the list at the top half of the page, and the surgeons working at the selected practice are shown in the bottom half of the page.
Although you can add and edit surgeons and practices 'on the fly' ( see Add a New Customer ) the setup wizard gives you the bigger picture. It's easy to add or edit several Surgeons or Practices and see the relationships between them.
In the Setup Wizard Surgeons page, highlight a practice (use the Practices page to create one if you don't have any available) and then click the green ![]() icon. Add some details to a new surgeon record, then click Ok. Again, fill in as much details as you can as you can always come back and update the details later.
icon. Add some details to a new surgeon record, then click Ok. Again, fill in as much details as you can as you can always come back and update the details later.
Refer to the Add a New Customer page for guidance on setting up a surgeon.
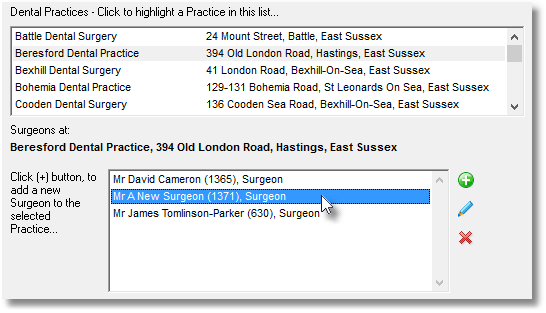
Notice that after adding a surgeon, the selected Practice now shows the new surgeon.
Choose 'Products'..
This window gives the ability to view, add, remove, edit and copy Products, including non-financial items (line notes).
Please refer to the Add a New Product Item page for guidance on adding a new product.
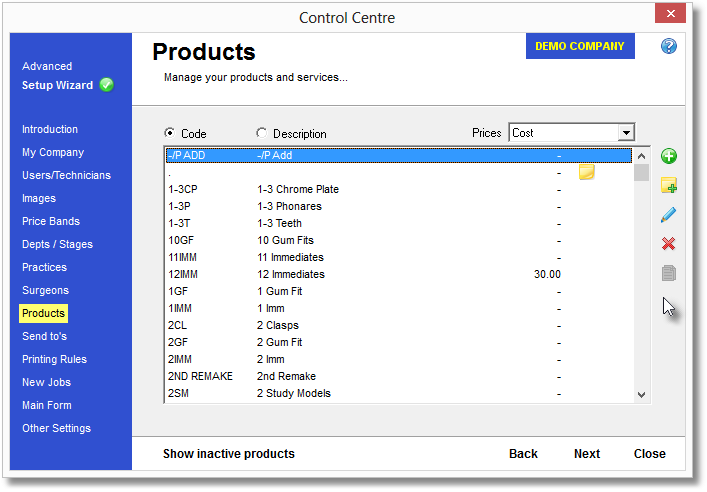
Note that in our documentation, Products may also be referred to as 'Sales Items'.
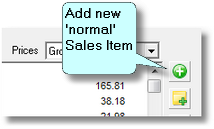
Some Products are normal (real) ones which may have a financial value..
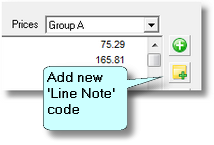
..and some are just codes for 'Note items' or Line notes..
These are your printing and Email channels.
The most important one to start with is 'Printer'. If your print outs arn't happening, click Printer, choose the Edit icon and Assign your Printer.
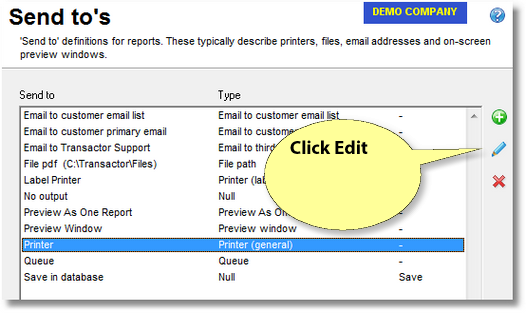
You can get Transactor support to advise you on these.
These are your printing rules for when you do an Action such as Book In, or Book Out.
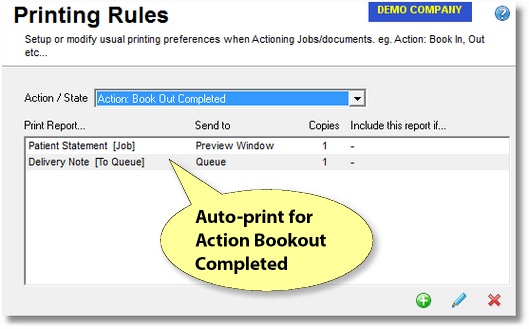
In the above setup for example, the Action - Book Out Completed is selected at the top. You can see that Transactor Lab Manager will prompt to automatically print a Patient Statement, and a Delivery Note to Queue for each job that gets Booked Out Completed.
By the way, Delivery Notes to Queue are pretty neat. They are collated by Practice so you get one Delivery Note per Practice, containing all the jobs in that Booking Out session. After a bunch of jobs have been booked out, choose Reports > Jobs > Delivery Notes Print Queue and choose All Unprinted.
You can change these preferences by choosing the Action / State and clicking the Add, Edit or Delete Icon.
Click 'New Jobs'..
These settings affect what happens when you create a new job.
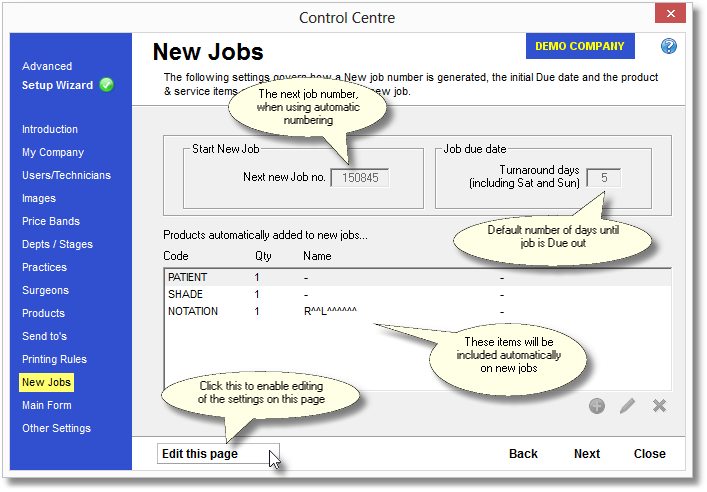
The next new job number will be the one issued automatically if the Job Number box on the Main Form is blank when you click 'Action - New Job'. (If you are using your own job numbers you type it in to the Job Number box on the Main Form and press Return).
The Job Due Date - Turnaround days are what gets added to 'todays' date to pre-populate the Job Due Date. It's not going to be spot on every time but on the occasions it's guessed wrong you can type over it.
Products automatically added to new jobs. These row items will appear on each New Job started. You can add or remove any Product or Line Note from your products list here. This is a powerful control to ensure you gather the data you want on your jobs.
Click 'Main Form'..
Use these settings to configure the default customer type and the way some data is displayed on the Main Form.

Remember you will need to click the "Edit this page" button before you can make any changes to this page.
The Customer details options allow you to choose which of the customer's details appear at the top of the Main Form.
The Item columns govern what data is shown for the line items. You can also change this 'on-the-fly' from the main form, by right-mouse clicking on a row and choosing "Set display format..."
The Sub Totals options let you decide what information to show at the bottom right of the job.
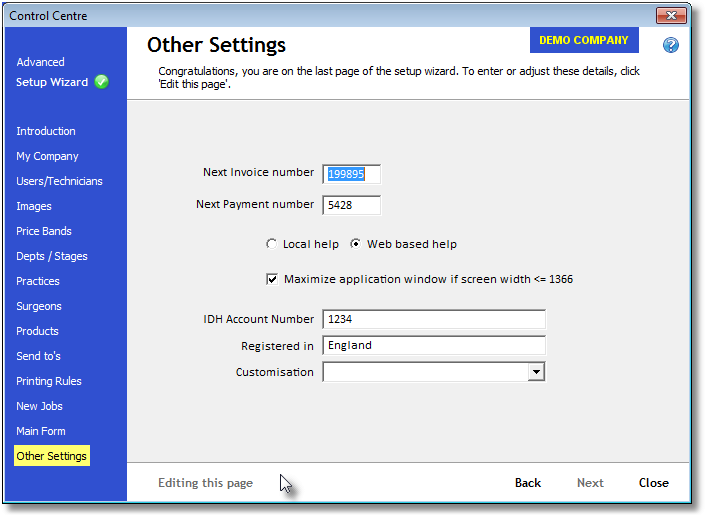
Click 'Other Settings'..
You can set the Next Invoice number, which determines the invoice number used the next time you book out charge a job. If the invoice number is already in use, Transactor Lab Manager will automatically try to use the next sequential number until it finds an invoice number that hasn't been used before.
The Next Payment number refers to the ID number of payments added to the system. Again, if you specify a number and when you add a payment Transactor Lab Manager finds that number is already in use, it will find the next available number automatically.
Choose Local help to use the help files on your computer, or Web based help to use online help. Web based help will always be more up-to-date than the local help so if you have internet access on your Lab Manager PC you should leave web based help enabled.
If you have an IDH Account number, enter it in the box. This number will appear on your IDH invoices.
You will also require entering your company's country of registration in the Registered In box, for the purposes of your IDH invoices.