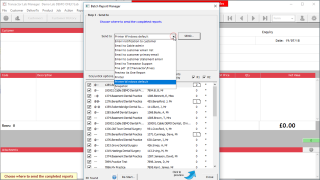
Use the Batch Report Manager (BRM) to produce many statements or summary invoices at once.
If you just want to produce one report for the customer on the Main Form, instead use Report menu > Customers.
To start the BRM use Report menu > Customers > Batch Report Manager, or Tools Menu > Batch Report Manager.
Note: To further expedite your month-end run, from the Tools menu you could choose to start the BRM for dentists only, or for practices. This skips the first step of the BRM.
The Batch Report Manager works by walking you through three steps:
| 1. | Select the customers you want to run reports for |
| 2. | Choose a report and run it |
| 3. | Send the reports to your printer, customer's email address, or save them as files |
A video covering the month-end procedure is available below.
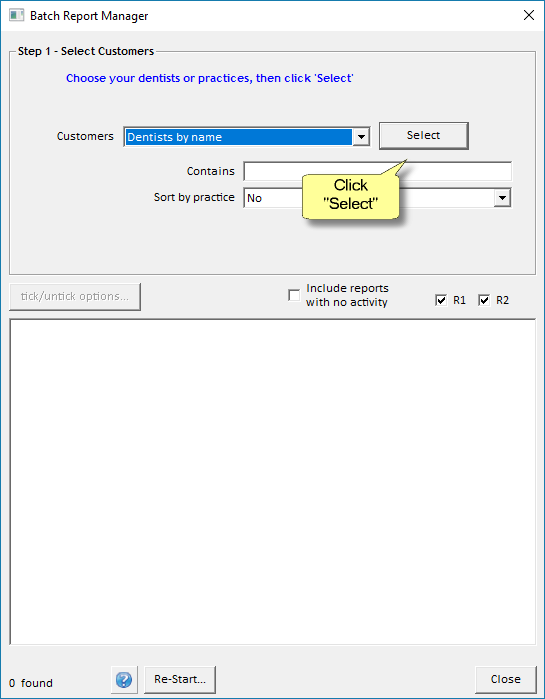
Step 1 of 3. Select Customers
| • | Choose 'Dentists by name'. |
By leaving the "Contains" box empty we're choosing to select all our customers (just dentists in this case). If we added a part of a name to this box, only those customers whose name matches this will be selected.
Notice that if you click on the Customers drop-down box it offers options to select dentists or practices by name, or by tag. See the table below:
Dentists by name |
To run reports for all dentists just leave the Contains box blank and click Select. For selecting a sub-set by name, enter the beginning of the surname in the Contains box. |
Dentists by tag |
Select only those dentists that have the tag you specify. You must have already assigned tags to your customers for them to be found. For example, if you already have some dentists tagged as "Oasis", and you choose "Dentists by tag" and then select "Oasis" then just your Oasis dentists will be selected ready for step 2 of the Batch Report Manager. |
Practices by name |
The same as Dentists by name, except this selects practices matching the name you specify in the Contains box. |
Practices by tag |
The same as Dentists by tag, except this selects practices that have previously been tagged with the tag name that you select. |
| • | Click Select |
You will be moved on to step 2.
Step 2 of 3. Run Report
| • | Choose a report from the Report drop-down box. Common monthly reports are Statement (monthly) and Summary Invoice (monthly). |
For this example, we're going to run a Summary Invoice (monthly)
| • | Different reports may prompt you for further details, such as a date range. For a Summary Invoice (monthly) you will need to select which month to run it for and if you want to include any existing credit notes on each summary invoice. |
| • | Click Run Report |
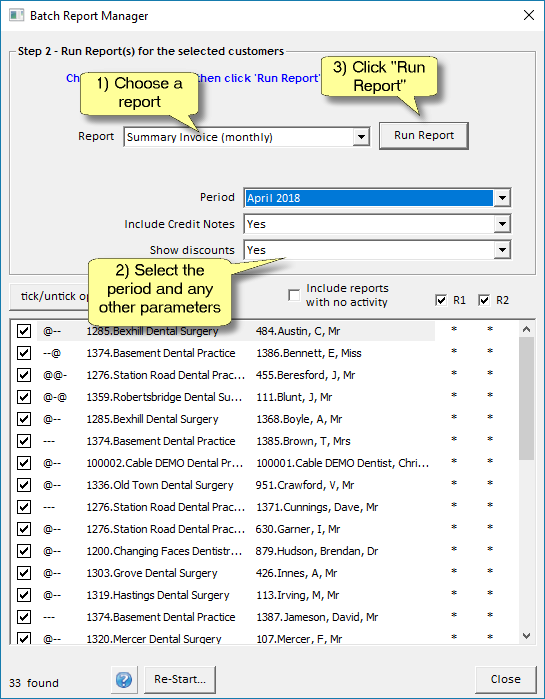
You'll notice Transactor works through your list of customers, adding a number to the right of each one. If you had unticked the box next to a customer's name in the list then Transactor will skip that customer.
For customers which have been active in the period you chose, Transactor will add a box beside them which contains the number of items on the report.
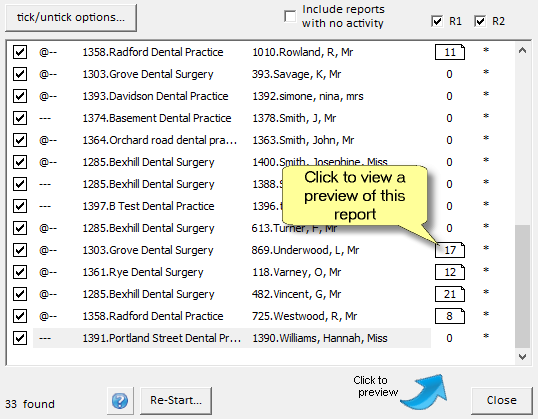
Once the whole list of customers has been processed you can click the boxed number next to any customer to see a preview of their report.
Customers who have not been active will have a zero placed beside them. Transactor will assume you do not wish to print/email these, but you can change this behaviour - see the notes at the end of this topic.
Step 3 of 3. Send Reports
| • | Click "Go to Step 3. Send reports" at the top of the Batch Report Manager window |
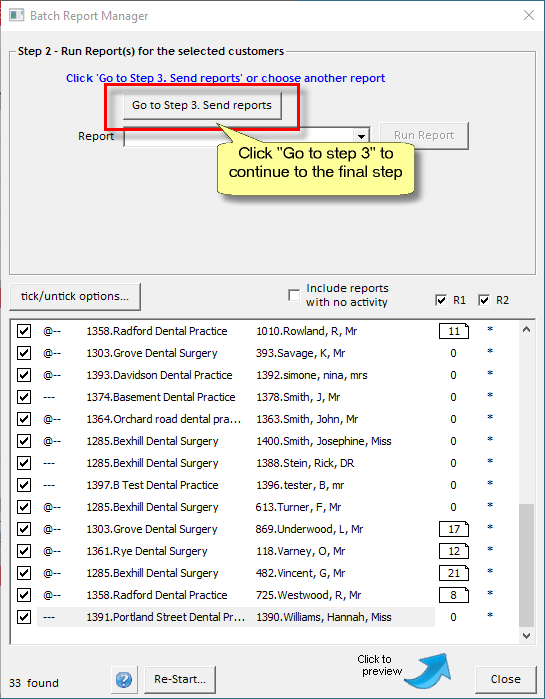
Tick/untick customers you want to exclude from the run
The tick/untick options help you to manage your report runs so that you can choose some reports to be sent via email, for example, and others to your printer.

You could decide you only want to send email invoices to those customers who have email addresses, then print the rest.
You may notice some customers have some @ symbols beside their name. This indicates that customer has a primary, list and/or statement email address stored in their profile.
So, you can click the "tick/untick options" button then choose "Untick all" from the list, which will deselect every customer, then click the button again but choose "Tick email (primary) customers". Now only the customers with primary email addresses are ticked.
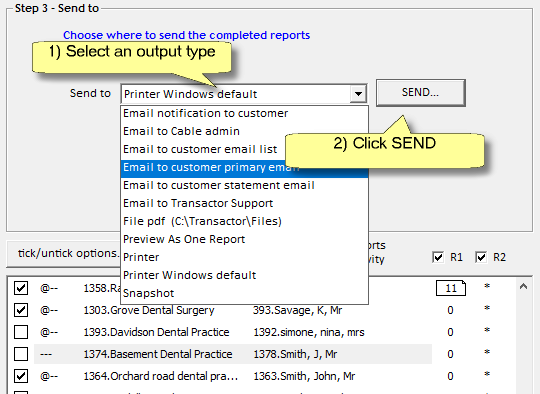
| • | At the top of the window, choose which output medium you want the ticked reports to be sent to |
| • | Click SEND |
You could now choose to remove ticked customers using the tick/untick options button, then tick all the remaining customers and send to your printer.
Step 4.
Only joking ! There's no step 4, your work is done. In less than 30 minutes you could have produced 100s of reports, and distributed them to your customers, some by post, and some by email.
That's it. But here's some more reading..
More on 'Send to' channels
Email to customer email list |
Send an email to all recipients in the customer's "email list", as configured in the customer's profile. You should have previously entered your email account details into the Transactor Emailer |
Email to customer primary email |
Send an email directly to the customer's primary email address. You should have previously entered your email account details into the Transactor Emailer |
Email to customer statement email |
Send an email to the statement email address, as stored in the customer's profile. This is useful if your customer wants their monthly invoices sent to an accounts department, for example. |
Email to Transactor Support |
Send each report via email to Transactor support. We may ask you to do this if you have a query related to the Batch Report Manager. |
File pdf |
Save the reports to a folder. One customer per PDF file. |
Preview as one report |
Show all the reports together as one document. This will appear in a preview window from which you can print, save PDF or email. |
Printer Windows default |
Send the reports to your Windows default printer. |
You may have other output options appear in this list if you've set these up, or if Transactor support has done this for you.
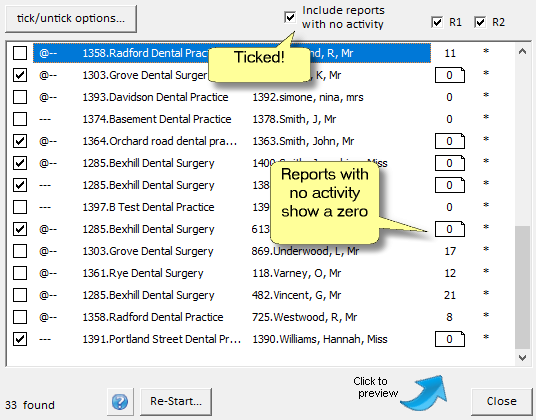
Include reports with no activity
Tick this box to include reports containing "no activity" in your distribution. These zero populated reports are those that have no significant rows - for example, customers who had no activity for the period. By default, Transactor assumes you wouldn't want to print or send these reports.
Balance-only reports
When the preview icon beside a customer shows "Bal" then the report is a statement with just a balance brought forward (b/f) and a balance carried forward (c/f). This means there's still money owing - so you probably still want to print it. If not, just untick the customer.
![]()