How to get here
Tools menu > Control Centre > Setup Wizard > Send To's.
From this page you can define the available forms of output for your reports and documents. These include printers, email addresses and files.
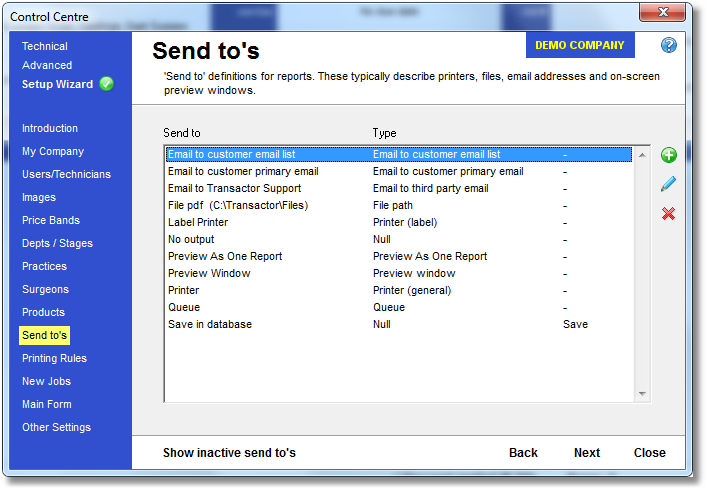
In the list that appears, the "Send To" column lists the output types you have available, and the "Type" column gives the type of output each Send To item is. For example, the "Label Printer" item is a Printer and a "PDF File" output is a file path.
Output Types
Email to customer email list |
Send to all recipients on the customer's email list |
Email to customer primary email |
Send to the customer's primary email address |
Email to third party email |
Send to a specified single or multiple email address |
File Path |
Send the output directly to a file (such as a PDF) |
Null |
Do not produce any output |
Preview as one report |
Show the reports as a single document on the screen, rather than multiple separate reports. Useful for saving the output to a single PDF file |
Preview Window |
View the output on your screen, from where you can print or save as PDF |
Printer (general) |
Produce a document or report on one of your available printers |
Printer (label) |
Produce one or more labels on your available printers |
Queue |
Do not produce any output immediately, but queue it for printing later. You can view items in the queue by using the Tools menu > Queues. Usually used for Delivery Notes. |
![]() Add a Send To output - third party Email
Add a Send To output - third party Email
Click the green bubble icon on the icon strip to the right side of the output list.
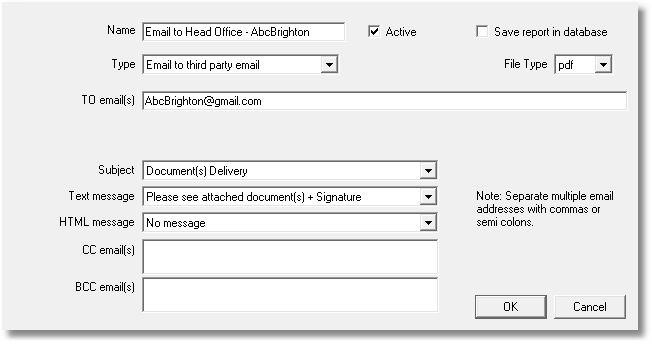
| • | Enter a name for your new output - something descriptive of the destination such as "Email to Head Office - Brighton ABC". |
| • | Select the Type of output - Email to third party email |
| • | In the "TO email(s)" box enter the email address(es) to send to. |
How to format multiple Email addresses
Examples |
|
Single email |
jsmith@gmail.com |
Multiple emails |
Separate email addresses with commas or semi-colons jsmith@gmail.com,AbcBrighton@gmail.com,DavidC@Number10.gov.uk
Note: On versions before 7.08 (06 Nov 2013) use angled brackets as below instead of the format shown above <jsmith@gmail.com>,<AbcBrighton@gmail.com>,<DavidC@Number10.gov.uk>
|
| • | Select the File Type for the document attachment format. As a rule of thumb, you will probably want to choose PDF (Portable Document Format) as this is good quality equivalent to a physical print-out and cannot easily be altered after creation - perfect for invoices! |
| • | The Subject box refers to which Email Subject macro to use. You can edit these from the Reports & Tasks page of the Advanced section of the Control Centre. |
| • | The Text Message box refers to which Email Text Message macro to use. Sending emails as 'plain text' should result in being more compatible with recipient's email software, as well as being considered safer by their virus killer. You can edit the Email Text Message macros from the Reports & Tasks page. |
| • | The HTML Message box refers to which Email HTML Message macro to use. HTML email allows style and colour formatting, as well as including graphics but will require knowledge of the HTML scripting language. You can edit the Email HTML Message macros from the Reports & Tasks page. If you choose a HTML message, this will be used instead of your text message! |
| • | Include any email address(es) you wish to CC (carbon copy) in the CC Email(s) box |
| • | Include any email address(es) you wish to BCC (blind carbon copy) in the BCC Email(s) box. Recipients cannot see who you've "BCC'ed" like they can with normal CC. |
Now you have set up a new output, you may want to configure it as the default output for some of your reports. Take a look at the Printing Rules page for help on doing this.
You can have multiple 'SEND TO' rows for different Email to third party email targets.
![]() Add a Send To output - Printer
Add a Send To output - Printer
Click the green bubble icon on the icon strip to the right side of the output list.
| • | Enter a name for your new output - If you only have one printer, then 'Printer' is fine or else use something descriptive such as "HP Laser jet at reception". |
| • | Select the Type of output - Printer (general) |
| • | Leave the File Path and the File Type boxes blank |
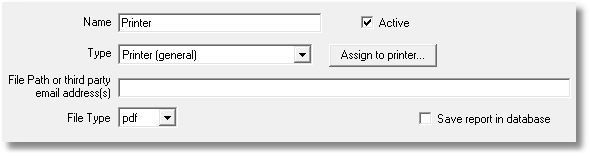
Click Assign to Printer to configure the Printer properties such as default page layout and colour quality etc. These settings will depend on the facilities of your printer.
Now you have set up a new output, you may want to configure it as the default output for some of your reports. Take a look at the Printing Rules page for help on doing this.
You can have multiple 'SEND TO' rows for different Printers or Printer Properties. You may be able to setup additional SEND TO rows for the same printer but with different properties. With some printers with multiple trays you could target printing output to a specified tray.
![]() Add a Send To output - File Path
Add a Send To output - File Path
Click the green bubble icon on the icon strip to the right side of the output list.
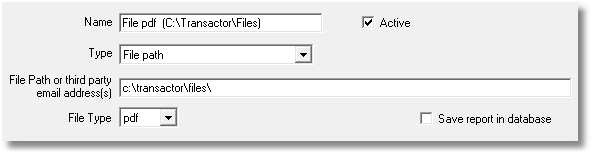
| • | Enter a name for your new output - something simple but descriptive of the file such as "Create PDF file". |
| • | Select the Type of output - File Path |
| • | In the File Path box enter the full location to where you want your file saved. If you do not include a final backslash '\' your file's name will be prefixed with the preceding text. For example, creating an Invoice for a job numbered "INV33" as a PDF file will yield these results with different File Paths: |
File Path |
Name and location of file will be... |
Actual file name |
C:\Users\Main\Documents\Invoice- |
C:\Users\Main\Documents\Invoice-INV33.PDF |
Invoice-INV33.PDF |
C:\Users\Main\Documents\Invoices\ |
C:\Users\Main\Documents\Invoices\INV33.PDF |
INV33.PDF |
| • | Select the File Type. As a rule of thumb, you will probably want to create most documents as PDF (Portable Document Format) as this is good quality equivalent to a physical print-out and cannot easily be altered after creation - perfect for invoices! |
Now you have set up a new output, you may want to configure it as the default output for some of your reports. Take a look at the Printing Rules page for help on doing this.
You can have multiple 'SEND TO' rows for different File Paths..
![]() Edit an Output
Edit an Output
Select the output in the list that you wish to edit, then click the pencil icon in the icon strip to the right of the list. You will be presented with the same box as you receive when adding a new output (see above).
From here you can configure the output, including marking it as inactive.
![]() Delete / De-activate an Output
Delete / De-activate an Output
Select a row in the list and then click on the red cross to mark it as deleted / inactive.
This is the same as editing the output row and un-ticking "Active". Inactive items are still available if you decide to make them active again later, simply view the Inactive Items (see below), edit the Inactive output row and tick "Active".
View Active or Inactive Outputs
To view inactive items, click Show Inactive send to's. |
|
To view only active items, click Show active send to's. |
|