Using the Main Form
|
We'll start by taking a look at LabManager's Main Form and try a few common things.
Introducing the Main Form
The screenshot below shows how your Main Form will look to begin with.
Let's show you how to get started!.
Select a Customer
Select a customer by using the 'Customers' button on the toolbar...
The 'Customers' window will let you search for existing customers, or add new ones.
You can narrow down your search by choosing from one of the options in the 'Search' dropdown menu.
Notice that the second column (above) displays the Delivery Address which is usually the practice. Out of interest, if we had searched for 'All Customer accounts', the results would contain Direct Patients, other Dental Laboratories etc. In this case, the list's columns would show the customer name, invoice address and delivery address.
The selected customer's details will now appear on the Main Form. |


|
• |
The yellow background is used to highlight the piece of information you're currently working with. Move onto the next box by using the TAB key or just click in the box you want to use. |

Job Items
This area forms the large middle section of the Main Form and lists the items for this job. These items are added by the user and can be modified at any time prior to the job being booked out and invoiced.
LabManager can also be configured to add default items to new jobs to save you having to enter these every time a new job is created, see the Help Documentation
In this section, many types of items or information can be entered, these include:
|
• |
Special template notes (for example: patient details, shade required or notation) |
|
• |
Products and Services |
|
• |
Notes |

Action Bar
This area shows which actions are available to you, along with the hotkey you can press on your keyboard to complete that action. These icons can also be clicked.

The actions available will change depending on what you are doing at the time.
Menu Bar and Toolbar
At the very top of the form is the menu bar. When you click on one of the headings, a menu will drop down with relevant options.
Below this is the toolbar, which gives quick access to useful tools.

Attachments
Attachments are files that have been linked to the job, such as photos, 3D scans and PDF documents.
The Attachments area lists any files that have been linked to the job.
|
• |
To add a file, click the green bubble at the top right of this area, or right click this area and choose "Add new", or press the Insert key when this area has the focus. |
|
• |
To open a file, double-left-click on it, or select it and press the space bar, or use the right click menu. Note that you must have an appropriate viewer installed on your computer for that type of file. |
|
• |
You can also delete an attachment from the right click menu. |
|
• |
If you choose to allow practices and dentists access to your LabManager, via Transactor LabManager (cloud version), note that you can add PRIVATE attachments, which are only visible to the lab, by using Job menu > Add PRIVATE attachment. |

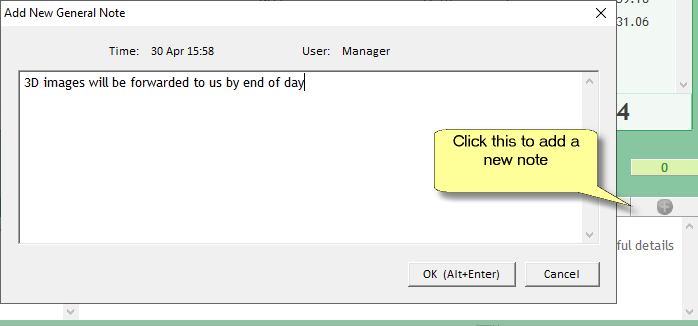
General Notes
This area lists any comments that have been added to the job.
|
• |
To add a comment to this area, click the green bubble at the top right, or right click this area and choose "Add new", or press the Insert key when this area has the focus. |
|
• |
You can delete a note from the right click menu. |
|
• |
If you choose to allow practices and dentists access to your LabManager, via Transactor LabManager (cloud version), note that you can add PRIVATE general notes, which are only visible to the lab, by using Job menu > Add PRIVATE general note. |
Help
At the bottom of the main form you will often see a helpful prompt, this changes depending on what you're doing at the time so if you're wondering what to do next, check what it says here!
Additionally, hover your mouse over a button or control to see a tip.

If you're Stuck
Most of the screens within LabManager will have a question mark icon in one of the corners, clicking on this will show a help window for the screen you're currently looking at.

